2014
Digital Tutors
Pierre Derenoncourt
01:15:00
English
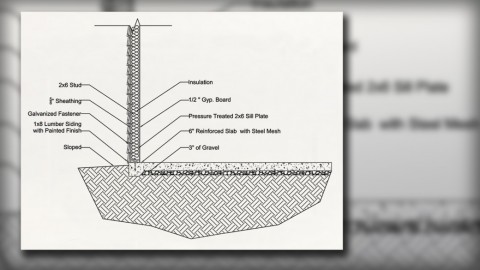
In this set of tutorials, we'll take a step by step approach to drawing a lumber construction detail. We'll start from the ground up and begin with the foundation. We'll learn how to use Polylines and Hatching to get the foundation in place. Next, we'll draw the sill plate and studs included in the detail. While we draw each element in the detail, we'll be sure to manage our Linetypes, Layers and Hatch Patterns accordingly in order to create a well organized drawing. Finally, we'll add some text and leaders to reinforce the graphic components of our drawing. By the end of this tutorial you'll have a solid understanding of how to draw a simple lumber construction detail using mainly Polylines and Hatch Patterns. You'll also learn to create a drawing that is well organized, detailed and professional looking. So with that I'm ready to get started and I'll meet you in the next lesson!
01. Introduction and project overview
02. Drawing the foundation using Polylines
03. Drawing sheathing and gypsum board
04. Drawing the sill plate and fastener
05. Using a Linetype for insulation
06. Using Polylines to draw the siding
07. Using a Linetype to draw the siding fasteners
08. Using Hatch Patterns to define materials
09. Adding Multileaders and text to the plan
http://www.digitaltutors.com/tutorial/1671-Using-Polylines-and-Hatch-Patterns-to-Draw-a-Lumber-Detail-in-AutoCAD
Download File Size:355.84 MB