2014
Digital Tutors
Adam Fairless
10h
English
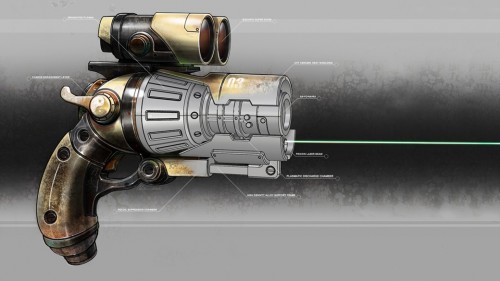
Throughout this training, we'll build a relatively complicated ray gun. We will use techniques already covered in the 'Beginner Rhino' course, as well as expand and add to our tool set as we progress through the model.
New surfacing and trim tools will be covered, along with adding details that will make your Rhino model stand out.
By the end of this tutorial you will be able to take on more demanding designs and acquire a better understanding of the problems presented when building complicated elements and how to solve them.
1. Introduction and project overview
2. Creating the basic elements
3. Refining the binoculars
4. Adding radii to the binoculars
5. Installing lenses on the binoculars
6. Creating a parting line
7. Finishing the first parting line
8. Adding more parting lines and bolts
9. Duplicating our single scope into binoculars
10. Offsetting the binocular surface
11. Mounting the binoculars onto the gun
12. Building the main surfaces of the gun
13. Roughing in the barrel of the gun
14. Working on the lower barrel guard
15. Finalizing the lower guard surfaces
16. Building the upper barrel guard
17. Trimming the upper barrel guard
18. Completing the upper guard
19. Adding the front support structure
20. Refining the front support structure
21. Building the lower support bar
22. Adding details to the lower support bar
23. Populating areas of the model
24. Finishing our copper barrel ring
25. Adding coolant bars to the barrel
26. Cutting part lines into the barrel muzzle
27. Adding chamfer details to the upper guard
28. Completing the chamfers
29. Adding chamfer details to the lower guard
30. Cutting windows into the ammo barrel
31. Organizing our layers
32. Refining our binocular mount
33. Adding a cocking mechanism to the gun
34. Adding the cocking mechanism arm
35. Integrating the cocking mechanism
36. Finishing the binocular bracket and mount
37. Adding details to the gun body
38. Adding a dome to the rear gauge
39. Attaching the laser pointer
40. Refining the guide curves
41. Building the gun handle
42. Refining the base surface
43. Adding the trigger guard
44. Adjusting the trigger guard
45. Integrating the trigger guard into the handle
46. Splitting the handle surface
47. Manually building a chamfer
48. Finalizing the main handle surface
49. Adjusting proportions of the lower elements
50. Building the final surface of the gun
51. Editing the curves
52. Finalizing the curves
53. Building the final upper surfaces
54. Editing surfaces to finalize our gun model
55. Creating the final surface
56. Adding the rotation piece
57. Finishing the rotating mechanism
58. Installing the final details
59. Using the edge analysis tool
http://www.digitaltutors.com/tutorial/1543-Modeling-a-Ray-Gun-in-Rhino
Download File Size:2.1 GB