2014
CGCOOKIE
Kent Trammell
04:40:00
English
What You Will Learn
UV Unrwapping
Much like wrapping paper is to a gift, UVs are to a 3D model. In order to paint textures, UVs must be laid out flat. And ideally the result will be most efficient in favor of texel density – which is the amount of texture resolution applied to a models UVs. We will make use of the Texture Atlas Addon to consolidate our separate objects’ UVs into a single UV space.
Texture Painting
Blender’s painting system enables us to paint directly onto a 3D model, which is often desired over the traditional 2D-texture painting workflow (which Blender also features). We will employ these tools to paint base color, decals, and emission texture maps
Map Baking
Lighting utilities like ambient occlusion and cavity maps (dirty vertex) can be baked onto the UVs of an object as supplemental textures. In this course we will bake out several maps to aid the worn and torn elements of the helmet materials.
Material Creation
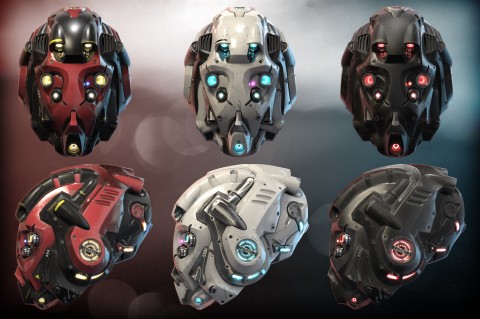
This is the meat and potatoes of the course. Here we dive deep into Blender’s Cycles shading nodes to construct complex yet flexible materials that will capture the tangibility of realistic surfaces. We will explore 3 variations of metal – painted, tinted, and bare – complete with intricate wear and dust components. Other material types include leather, LED emission, and lens glass.
1. UV Preparation
2. Understanding UV Unwrapping
3. Unwrapping Large Pieces I
4. Unwrapping Large Pieces II – Timelapse
5. Unwrapping Small Details
6. Consolidating UVs with Texture Atlas
7. Painting Base Colors
8. Map Baking
9. Decals
10. Establishing a Light Setup
11. Painted Metal Foundation
12. Painted Metal Wear & Tear
13. Painted Metal Dust
14. Tinted Metal
15. Bare Metal
16. Assigning Various Materials
17. Leather
18. LEDs & Lens Glass
http://cgcookie.com/blender/cgc-courses/texturing-shading-sci-fi-helmet/
Download File Size:3.84 GB