2015
Digital Tutors
Jeff Wolverton
2:20
English
In this Houdini tutorial, you’ll learn to realistically show wetness in your object shaders.
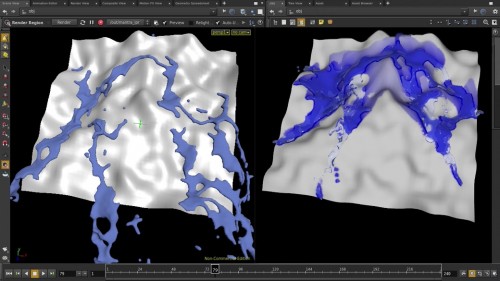
To realistically simulate fluids (water, blood, paint, oil, etc), often a wet map is required to change the shading of an object where the fluid comes into contact with an object. These need to animate, not only while the fluid is active, but also afterwards to simulate drying.
The usual solution, generating a wet map, or fixed set of images for a texture map has several drawbacks: fixed resolution, color depths, and difficulties applying across objects or to subsequent shots in the film.
This Houdini training introduces a new method for simulating wet objects, a shader-based method that first generates a 3D cloud of animated wet points, then by creating a shader that will use this data to shade the wet or drying parts of the character that were previously in contact with a fluid.
This will be accomplished without any need to create or rerun the original fluid simulation.
1 Introduction and project overview
2 Setting up the paint splash
3 Forming paint splash fluid and wet points
4 Paint splash wetness transfer
5 Creating the wet map points point cloud
6 Constructing the wet shader
7 Finishing the shader
8 Floating the innertube
9 Setting up the Innertube fluid simulation
10 Creating wet map points and a wet shader
11 Finalizing the float tobe
12 Zombie and blood
13 Setting up the blood
14 Simulating the blood
15 Finalizing the blood hit
16 Creating wet map points on animated geometry
17 Zombie blood hit final render
Download File Size:749.53 MB