2015
Digital Tutors
Justin Marshall
00:45:00
English
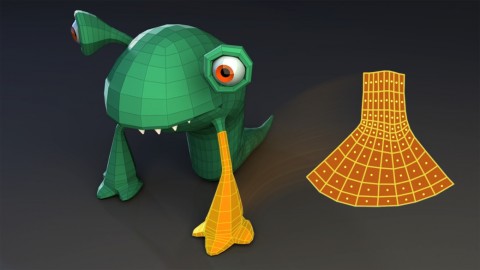
In this Blender tutorial we’ll discover the various UV tools in Blender, and learn to utilize them beneficially in our projects. UVs and UV layouts are important aspects of creating textures for our 3D models. The UV information serves as a bridge between the 3d objects we create and the 2d textures that we apply before rendering. UVs let us tell Blender how to apply the textures across the surface so having a good UV layout can really make a difference in speeding up the texture creation process and making your textures easily editable down the pipeline. We'll start by talking about the basic concept of UVs before moving on to learn about some of the different UV projection methods. We'll also talk about editing UVs and using multiple projections. We'll cover the output of reference files to give us a guide when texturing. By the end of this Blender training you'll have a better understanding of the purpose behind UVs and the knowledge you need to start creating and editing your own UV layouts.
Introduction and project overview 1 Introduction and project overview Watch it now 00:58
CG 101: UV Mapping 2 CG 101: UV Mapping 02:39
Basic UV projections 3 Basic UV projections 06:15
Unwrapping UVs 4 Unwrapping UVs 07:47
Using Smart UV Project 5 Using Smart UV Project 04:06
Mapping tubes and pipes 6 Mapping tubes and pipes 04:53
Editing UVs 7 Editing UVs 06:18
Using multiple projections 8 Using multiple projections 04:07
Transferring UV layouts 9 Transferring UV layouts 02:52
Outputting UV layouts as images 10 Outputting UV layouts as images 03:31
http://www.digitaltutors.com/tutorial/1963-UV-Mapping-Workflows-in-Blender
Download File Size:238.31 MB