2013
Digital Tutors
Justin Marshall
01:40:00
English
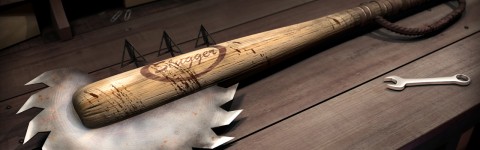
In this series of tutorials, we are going to go through the process of building and detailing a home-made zombie weapon using Softimage and ZBrush.
When building 3D assets, the ability of your computer to manipulate those objects is limited, especially when dealing with very high resolution meshes. Because of this, we use 2D images, like normal maps, to simulate the high resolution detail in a way that we can more easily use.
We'll begin by building the base geometry for our weapon in Softimage. Once the base geometry is modeled, we will detail and paint the improvised weapon in ZBrush using a variety of techniques. To finish up, we will generate maps for the color and sculpted detail before view our game weapon in Marmoset Toolbag.
When you are done, you will have a better understanding of the workflow involved in building and sculpting high resolution props and set pieces with Softimage and ZBrush and creating usable assets from them.
Lesson 1
Introduction and project overview
00:59
Lesson 2
Starting the base geometry
10:27
Lesson 3
Finishing the base geometry
09:20
Lesson 4
Creating a UV layout
11:41
Lesson 5
Transferring geometry to ZBrush
03:23
Lesson 6
Texturing the bat
06:16
Lesson 7
Adding raised wood grain
03:04
Lesson 8
Adding the straps
08:37
Lesson 9
Detailing the re-bar
06:06
Lesson 10
Painting the blades
09:06
Lesson 11
Adding bolts
09:41
Lesson 12
Projecting the geometry
04:07
Lesson 13
Exporting maps
07:09
Lesson 14
Viewing the game asset
07:05
http://www.digitaltutors.com/tutorial/1282-Creating-Game-Weapons-in-Softimage-and-ZBrush
Download File Size:1.13 GB