2014
Digital Tutors
James Whiffin
01:50:00
English
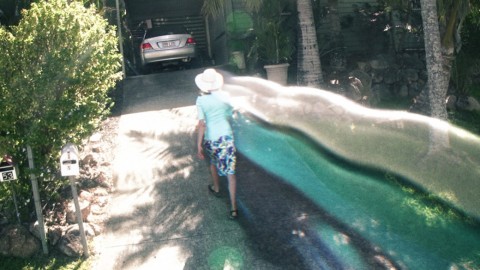
In this Maya and After Effects tutorial we'll create the entire pipeline for simulating a complex 3D time warp effect. Topics covered include setting up the live action shoot, rotoscoping techniques using mocha in After Effects and Matchmoving in PFTrack. We’ll also learn about 3D Camera Stabilization in Maya, creating our effect using custom MEL tools and compositing techniques in After Effects. By the end of this Maya and After Effects training, you'll have the knowledge to create your own 3D time warp effect for your projects
Introduction and project overview 1 Introduction and project overview Watch it now 00:51
Planning our idea 2 Planning our idea 09:47
Rotoscoping techniques 3 Rotoscoping techniques 11:59
Removing barrel distortion and auto tracking in PFTrack 4 Removing barrel distortion and auto tracking in PFTrack 06:42
Cleaning tracks and adding user tracks in PFTrack 5 Cleaning tracks and adding user tracks in PFTrack 09:51
Solving, orienting and assessing the accuracy of our camera solve 6 Solving, orienting and assessing the accuracy of our camera solve 10:46
3D camera stabilization in Maya 7 3D camera stabilization in Maya 09:26
Creating proxy geometry in Maya 8 Creating proxy geometry in Maya 09:52
Additional camera projections in Maya 9 Additional camera projections in Maya 04:42
Doubling the amount of samples 10 Doubling the amount of samples 06:37
Automating processes using a MEL script 11 Automating processes using a MEL script 04:03
Assembling the render in After Effects 12 Assembling the render in After Effects 08:51
Compositing in After Effects 13 Compositing in After Effects 10:59
Adding displacement, chromatic aberration and barrel distortion 14 Adding displacement, chromatic aberration and barrel distortion 05:23
http://www.digitaltutors.com/tutorial/1819-Creating-a-3D-Time-Warp-Effect-in-Maya-and-After-Effects
Download File Size:1.57 GB