2013
Digital Tutors
Kyle Green
01:15:00
English
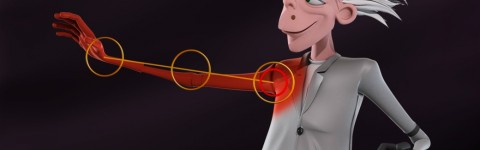
In this course we will explore various methods of using ZBrush to very quickly pose and add life to your characters. In this series of lessons we will discuss some of the tools and features we can use in ZBrush to very quickly give our characters a sense of life, emotion and personality without having to go through an extensive rigging process. We will begin by using the Transpose Master plug-in to collapse all of the SubTools on our mesh, and make the posing process much easier. From there we will begin transposing our mesh, and discuss a variety of masking tools and several different selection techniques that we can use to quickly and accurately re-pose our characters. Also, we will show how to create an articulated skeleton within ZBrush using ZSpheres. Using these techniques, you'll be able to quickly add life your character regardless of whether it was actually created in ZBrush, and we no longer have to go through a time-consuming rigging and binding process in any external application.
1. Introduction and project overview 01:20
2. Creating a Transpose mesh for easy posing 05:29
3. Overview of masking and transposing meshes in ZBrush 06:53
4. Transposing the scientist's legs 09:36
5. Transposing the character's arms and hands 09:07
6. Using topology masks to pose the character's fingers 09:01
7. Transferring transposed detail back to original SubTool mesh 11:03
8. Creating a ZSphere skeleton for posing characters 06:56
9. Binding ZSphere skeleton to a mesh for posing 14:54
http://www.digitaltutors.com/tutorial/145-Posing-Characters-in-ZBrush
Download File Size:787.75 MB